
 We were searching for slippers for my daughter (a toddler). But, post-Christmas there are tumbleweeds in the slipper aisles. Nada. So, I used what I have to make her comfy, cozy slipper booties. Here's how:
 First, I gathered my supplies - a thrifted vinyl tablecloth for the sole, fleece for sole padding, scrap fleece (from this project) for the bootie, thread, elastic, scissors, paper and a pen and any embellishments I wanted to add, such as ribbons or buttons.
 My next step, which was actually a challenge, was to trace my jumping/dancing/kicking toddler's feet.
 Adding my seam allowance (about 1/2",) I then cut out the soles from the vinyl tablecloth and two layers of fleece for each foot. I baste stitched them together. The sole is now three layers thick.
 Remember, none of this has to be exact because fleece (and bows) cover a multitude of sins ;) I roughly cut out two profile bootie shapes for each foot.
 Next, I sewed the right sides together of the top of the foot and from the heel to the ankle of the bootie. (Confused? Just leave the sole open and the foot opening at the top open.)
Pin the upper of your slipper to the sole, right sides together.
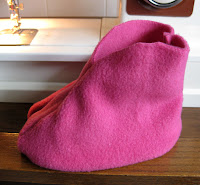
 Now, trim any excess fabric. This is what your inside-out slipper should look like.
 Next, turn the slipper right-side out.
 Now, trim any excess fabric. This is what your inside-out slipper should look like.
 Next, turn the slipper right-side out.
 This next step I forgot to photograph, but I took a narrow strip of elastic, 1" less than my daughter's ankle circumference, and sewed it to the inside of the ankle part of the slipper. This helps to keep it on. I just pinned the elastic in a few places and let it gather naturally as I secured it with a zig-zag stitch for stretch. Be careful not to sew the slipper shut. Not that *I did* the first time or anything.
I tied a couple of bows and stitched them onto the fronts for custom appeal. (Pics were taken before I sealed the fray on the ribbon.)
 Remember, it's ok to not have it exact. The first time I sewed the top portion of the foot, my slippers had noses. Um, not what I wanted to see. So, I just stitched it again in a smooth sloping line. Better!
They passed the test because my daughter slept in them the first night. She loves 'em! That's all that matters to me. But, I'm also glad they no longer have noses.

11 comments:
I recognized the fabric immediately! The slippers are just TOO adorable!! Good job! I know she loves them and I can't wait to see them!
Cute little slippers! I would *never* sew the slipper together!!! I only have 3 stitch rippers for a decoration ;-)
I'm amazed at your talent. Those slippers are adorable!
Those are so cute!! I wish I was that creative!
Thanks for stopping by my blog -- how funny that our daughters had the very same Valentine's Day baby legs :)
Cute idea! And love the vinyl tablecloth usage! Awesome.
I am sure I could never make slippers, but yours look great.
Those are adorable! This is going on my to-do list
That is such a clever idea. I wonder if I can make some for big people? ;-) Glad you toddler loved them.
thank you for sharing! what an awesome idea!
Such cute little slippers!
I know I can do it but probably your work is greater than mine. I'll follow all of your instructions and I'll practice to make my own boot slippers for women. Thanks for sharing this. I really like it.
Post a Comment